But first, I have to tell Mary I didn't see a Ghost until you said it LOL It's funny how a shape can be so many things to so many people. Deb, I don't have a problem sharing idea's because mine is already started and it is what I'm doing. So there!!! LOL I just hope you didn't see the same things.
As you all know one of the groups I belong to had a year long Banner swap. The theme was Vintage Winter, but every month also had a sub theme (usually one I liked better) so it was hard sometimes to keep that Vintage White originally called for. Nov. Banner was no exception. The sub theme was Fairy and it just didn't work for me in Vintage White.
So there she is. The background is a pale blue snowflake design and I managed to find trim the exact same color. I overlaid the trim with rhinestones, the silver flakes were cut with Sizzix, Austrian crystals add sparkle and the Fairy herself is very decorated and embellished , although it doesn't show. Her body was glued to the banner but her wings are bent forward. I like Fairies and I'd like to receive this one, so I'm happy.
AS you know we have had a spooky Mystery Challenge going on. I have a few things for the gals to make to add to their scene . I'm sure there are many spiders out there and probably all made a bit different. This one is small to hang from the tree in the Mystery.
The girls were told they would need wire,seed beads, bugle beads and two random beads one smaller than the other.
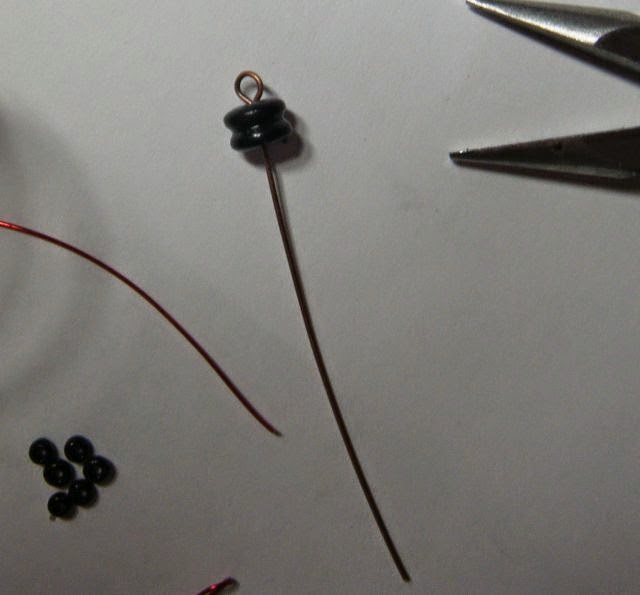
You will need 4 - 2 inch (5 cm), 24 seed beads and 16 bugle beads and one eye pin (you can make one using 3 in (7.62 cm) wire and twisting a loop at the end so it won't go through the bead hole.
Feed the bead that will be your spiders head onto the eye pin.
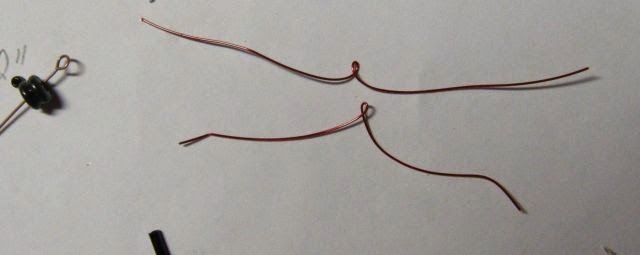
bend each of the four 2 in. wires in the middle and twist to form a small loop. At this time straighten the wires in your fingers
Feed them, via that loop, onto the eye pin.
Then add the body bead. Note I changed beads? That's because I had already made a spider for this project and decided I wanted one to wear with a particular outfit.
Make a tight loop behind the body bead to bring it all together. Then on each wire you will put one seed bead, one bugle bead, another seed bead (as the knee) then another bugle bead, ending with a seed bead, then twist left over wire into a small, tight loop. Do all eight legs like this.
Bend the legs in a spidery way and hang that little sucker from the tree you made...or....wear him on a necklace, add a pin. The fun thing about these little guys is.....
They can become BIG guys too. There are a million ways to put these together and depending on what color beads you use, they can be elegant (done in crystal or pearl) or down right creepy (done in black and orange, red and black). What ever you decide to do with this tutorial, if you make one, please share it with the group.
I have to add, I am extremely Arachnophobic. I mean to a point I almost ran off the road because a tiny spider was on my windshield...INSIDE!!! making these little guys has helped me develop a whole new relationship with them. I still find them creepy, but now I just pick them up and throw them outside rather then scream and look for a gun.
Enjoy making them!!! They make fun gifts and look cool sitting on a desk.


